Wednesday, August 31, 2011

pieces of paper


I made this canvas after I was inspired by a piece that Christy Tomlinson created. What you do is roll pieces of paper onto you canvas after you have created your background. I like it, I don't like it, I like it , I don't like it.. What do you think??? LMAO!!

Friday, August 26, 2011

Grungy Monday on Friday


Last Monday Linda over at Studio L3 had her Grungy Monday Challenge. You are suppose to use the Tim Holtz Facets or Fragments doing one of three Techniques he gives a tutorial on.

You can find Tim's Tutorial Here

I tried the technique where you make a Transfer using Packing Tape

wow this was so much fun and it worked!!

I've been trying to do transfers using my ink jet printer and haven't had too much luck

but this technique does work!


I used one of Wendy Vecchi's Art Part and painted it then Glimmer Misted the Stem

and then added Diamond dust to the Flower.

If you want to know how I created this background and a more in depth look at the tag

head on over to our


I have a complete tutorial on it.

It's a Spooky Day over at OWSE

we have a coupon for you all on our Halloween Products

use

Coupon Code

SPOOKY

and get 12% off of all our Halloween Products!

This sale is only going on until the 28th of August..

Better start buying you Halloween Products now so you have them created
in plenty of time for Halloween!

I love love Halloween..

and on that note

OWSE will be having their

1st. Annual Halloween Gala

if you not a member of the OWSE Yahoo Group

join us today!!

To be able to view our prices and shop at the Emporium

you must be a member.

We have loads of Challenges and Swaps to inspire you!!

Also our Art Journaling Club is in full swing now and we are all having a ball!!

Come Join us..

well you all have a wonderful and safe weekend.

Do you believe that August is almost over!!

man did it fly by!!

wooohooo here comes Fall!!

ya think??


Thursday, August 25, 2011

Learning to Shade with Copics

Before I bore you with My Copic Lesson

I decided to give both Ladies who entered my Contest

Two Digi's for entering.

I have emailed both

Max and Gloria M..

Congratualtions Ladies!!


I decided it's about time I learned to shade using the Grays with Copic Markers. So I grabbed my one of two Tilda's and found a Utube video and came up with this. I think I get how to do it. Now I have to practice doing it.. LOL


My Camera sucks.. It looks so much better in person..

What cha think??

Thursday, August 18, 2011

My Inner Gremlin


I'm in this Yahoo Group - Artists of the Round Table.. we are doing this workshop using the book

Raw Art Journaling by Quinn Mcdonald.. It's a really cool book if you are into Art Journaling. I bought mine at Amazon.. Well anywho Quinn is doing the workshop at the Yahoo Group and our first lesson was to do a spread on our Inner Gremlin.. I just bought a sketch book to find out if I can indeed draw. I have always said I can't draw a stick figure right. Was that my Inner Gremlin saying that before I had even tried??? I have never tried to draw! How can I say I can't when I don't even know!!

We had to Journal our Inner Gremlin talking to us and then positive reinforcement after hearing all the negative from the Gremlin..

Here is how I did mine.

Wednesday, August 17, 2011

I made Top Three!!


Over at Simon Says Stamp and Show I made Top Three last week for my Wild West Piece..
Wooohooo!! That is so exciting to be noticed..

Here is the piece I created

Robyn's Fetish - Win a Digital Stamp!!


Robyn's Fetish Digital Stamps and More is having a Huge Sale this Month!! 20% off all Inventory! wooohooo. and I finally have some new releases! It's my Back to School Series

Here is a sample


Would you like to win one of my Stamps? Your choice!!

Put my Badge on your blog,


become a follower and leave a comment and in a weeks time I will

pick someone at random to win a Digital Stamp..

Easy Peasy!!

On August 25th. I will pick one winner..

Make sure when leaving a comment you leave your email address for me to contact you..

Right Click on the Badge and "Save As"


Have fun Creating!!


Tuesday, August 16, 2011

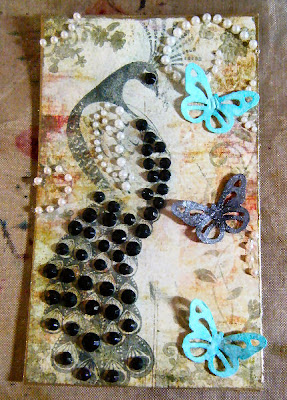
Not so Grungy Monday


Linda over at Studio L3 is having a Distress Stickles Party! in other words this weeks Grungy Monday challenge is to use Distress Stickles.Distress Stickles is a Ranger Product that Tim Holtz always brags about.. Want to know more about Tim, visit his blog here..

well I had in mind what I wanted to do but I tried two times and each time I did something and then covered it with Rock Candy Distress Stickles I had ink all over the place. I tried them with Perfect Pearls and Twinkling h20's .. both ran when the stickles were applied. boooo on Distress Stickles. LOL so I covered my piece with some paper and just used the Perfect Pearls on my image and the Distress Stickles on my Butterflys. Hurray!! I finally got this piece done with out throwing it out in the garbage! LOL

I used a Blue Perfect Pearls but it looks Black in the picture..

I used Green on the Leaf border


I'm also entering this in Simon Says

They asked for Bling this week. I think I have enough! Ya think?? LOL

My Piece is not so grungy this week.. ahhh well.. LOL

Hey you all!! Thanks for looking.


Sunday, August 14, 2011

Fun with Art Parts


I just got this Book "Make Art" by Wendy Vecchi.. I got book #2. They are all sold out but we have book #3 on sale at OWSE..

Anyways I was reading it this morning and then got inspired by one of her pieces. She gives full instructions how to make each piece in the book. Well I'm just starting to collect Wendy Vecchi stamps and didn't have any she used in the book so I improvised. I used stamps I had and when it called for some kind of part like the heart for instance I drew it. I didn't know I could draw. ROFL!!

I drew the Hearts, House, Flowers, stems and door.. whew what fun I had!! For about two hours I was totally immersed in doing this piece. I used Grunge Paper for the parts. Love that Grunge Paper!!

Wendy suggests keeping all your little grunge board pieces to back your part with. Instead of that sticky foam stuff like foam dots. I took her suggestion and this works out so good.

I found that my perception is off. Everything I drew was big.. My piece is 5x5 but I kept drawing like it was a huge canvas. Eventually I got everything sort of to scale. Not like hers but what the hay!! LOL

This is the last day for the Big Sale over at OWSE

Get 12% off

any Order

over $50.00!!

Wooohooo! what a Gonga!!

the sale ends at midnight tonight!!

Go Shopping and get some Retail Therapy!!

I did!


Hey you all! Thanks for looking...

Saturday, August 13, 2011

Justin Goodwin


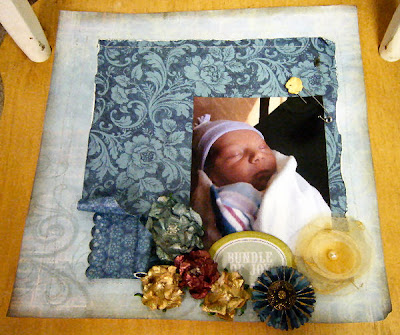
I have a new Grand Nephew!! My Nephew Matt and his wife Nancy (the doctor) just had a beautiful baby boy!! His name is Justin Goodwin.. He is Gorgeous!! My Nephew just graduated College and is going on to Law School so there is a lot going on in his life right now.. I am so happy for both of them!!

I grabbed a picture of Justin on Facebook and did a Layout with it. The first of many I'm sure!

I first inked the edges of my 12x12 paper

with Walnut Stain Distress Ink

then in my stash of paper I found this Graphic 45 piece of paper and

distressed the edges heavily with my Distress tool

I stitched around the 12x12 paper and the top of the scrap piece of paper not really trying
to stay straight..

I then cut a strip of the Graphic 45 paper I had another scrap of and created the border

which I put underneath a big torn edge of the first piece of scrap paper..

Then I thought what else does this need.. flowers of coarse!!

I took out my White Petaloo Flowers .. They are the "Wild Roses" and are just right for painting.

I painted them with Perfect Pearls.


The best technique for doing that is to spritz a little water on your crafts mat and put a little of the perfect pearls in it.. The mat stays wet and it's so easy to clean up.

With Perfect Pearls you do not need a fixative they have one build in..

Sometimes I use Pearl Ex or Twinkling h20's with both I spray with hairspray when I'm done ..

When the flowers were completely dry I inks the edges of them with Walnut Stain to give them

some contrast in color..

I then scrunched them back up to give them their form back..

You really need to do this just before they are totally dry and then again after their dry..

I added the little Safety Pin from this Page Kit I just bought called

Baby Boy..

All of these products I used and tools are available


our Discount Shop for all your Scrapping and Art Supplies.

You need to be a member of our Yahoo Group to view our heavily discounted prices

and shop..


Right now over at OWSE we have a big Sale going on

Use Coupon Code

NEWS


and get 12% off you order of $50.00 or more!!

Wooohooo!! Shop till you Drop!!

Hey!!!! Thanks for looking..

Wednesday, August 10, 2011

The Wild West


I was playing with my Alchohol Inks this morning. Well about 8-9 hours ago I started before I had to go out and get some blood work done. Yeah the vampires took all my blood today! LOL

anywho I got this background done and as soon as I saw the results of smearing my Glossy Card Stock through the inks on my work mat I thought of Tucson. I lived their 30 years and saw a lot of the Wild West. From Gun fights in the bars (LOL) to the Copper Mines and the Silver Jewelry sold by a lot of my friends. yes there was a gun fight in this seedy Biker Bar I used to hang at. Don't even get me started on a chapter of my life. ROFL!!

anywho again once I thought of Tucson I thunked now what can I do with this background to reflect the feeling of the Old West and then I went like ah Duh I have that great Stamp Set of Tim Holtz's.. So out it came and I went to work.. I embossed the Saloon image once I stamped it on the background and inked the edges with Distress Ink - Walnut Stain.. Then I took the Saying "Wild West" and stamped it on a Shipping Tag. I love using Shipping Tags to stamp saying on. They are so nice and sturdy and look so old when you ink them up.. I embossed this with "Pirates Gold" embossing powder and yup inked it up on the edges and some in the Shipping Tag itself. To give it an old look.. I used my Vagabond Machine and created a Rosette .. I put a little of the Rub n Buff Copper and put some of this on the Rosette then added the button from once again Timmy. Then I needed another piece to put this on. I took apart a piece of cardboard and with my blending tool used some more Walnut Distress Stain. I then took some more Rub n Buff this time the "Gold" and put that on the raised part of the corrugated cardboard. I grabbed two washers and two brads of Tim's and added that and then once again with the Alcohol Inks ( Ginger) I added it to the clip.. I then sanded it a little bit to get an old tarnished look.. Voila !! My piece was done!


I'm entering this in the Simon Says Challenge this week . You have to do a Tim Holtz Technique

The Technique I used was his Alchohol Ink Monoprint..

Hey!! Thanks for Looking!!

Robyninski the 143rd.


Tuesday, August 9, 2011

It's another Tequila Sunrise no it was Grungy Monday


Linda over at Studio L3 has a really Cool Challenge this week using a Tim Holtz technique of coarse. We used plastic wrapping and Dry Embossed it. I created this ATC card doing this technique. You can barely see my embossed plastic in the picture. I tried and tried different angles but I couldn't get it to come out.. Trust me it's really cool!!

I started off with Tim's Wrinkle Free Distress Technique for the background. Using Broken China and Weathered Wood Distress Inks. Then I stamped the snowflakes with the medium Perfect Pearls give you when you buy a kit. Then I brushed the perfect pearls "Forever Blue" over the card and brushed it off with a fatter brush..You get these brushes also in the kits.. It shimmers so beautifully! I edged my card with some Brushed Corduroy.. I stamped the Snowman on Grunge board with Versamark and then embossed with black embossing powder. Cut it out and then used the Pearl Paint Dabber. I can't find my Snow Cap Paint Dabber. duh.. Stamped the Sentiment and attached it to the card with some Glossy Accents. Then I cut a 2 1/2 by 3/12 peice of plastic paper.. Embossed it using my Vagabond Machine. and using the washer and some brads put it over the ATC Card.


It's a pretty simple little ATC Card but ohhh so cute!!

I wish the plastic Wrap would have shown up for you guys to see the effect.
It looks like a sheet of ice covering the card.
Cool Beans!!

Watercolor Crayons


I bought some watercolor crayons for my Art Journaling but decided to try them with creating a card. What I did was color the stamp with them. Then I spritzed using my mini mister with a little water and stamped repeatedly each time re coloring my stamp .. I blended some Old Linen Distress Inks and Black Soot Distress Inks .. Stamped my saying and Voila one card coming right up!! It was simple and easy but I really like the look..


Oh yeah I used Glossy Cardstock.

I want to try some of that Kryogen Cardstock I have
heard some talking about..

Thanks for Stopping by.

Monday, August 8, 2011

Bees Wax is fun!


I love working with Bees Wax and don't do it enough.. Yesterday I was reading my new book "Art at the Speed of Life" .. It's a really good book written by Pam Carriker. Actually a lot of Artists Contributed. Yes we have it at OWSE..

Well I got inspired finally after whining to the gals all day in the OWSE Yahoo group how I hate summer.. This is the Piece I came up with.


I'm so used to over doing my pieces with stuff. I wanted to put some pearls and flowers all over this piece but made myself stop. Trying to do the "Less is More' Theory LOL

Tell me what you all think..


Tuesday, August 2, 2011

Grungy Monday


I had so much fun working with the Distress stains yesterday I used them again to make this Piece for Grungy Monday!! This time we had to use Techniques from Tim Holtz 12 Tags of Christmas, 2008.. Click Here to see his Video..

Over at Linda's Studio L3 they are really doing some beautiful work with Tim's Techniques.. I want to personally thank Linda for being our Guest Artist at OWSE's "Christmas in July" Party .. She set a fabulous Challenge for our gals.. She is one Talented Lady and we were so Honored to have her as our Guest at the Party.. Thank you Linda..

well anywho here is my 6x6 piece for the Grungy Monday Challenge.


I started with a piece of Glossy Cardstock and then used
the Distress Stains .. I'm loving these! More information on how I did the Background is on my blog post below this one.. The Technique I used from Tim's tutorial was to bake the ink into the Vellum to make the paper look like Parchment. I don't know why but mine no matter how long I heated it wouldn't smoke like it was supposed to. It came out okay but I wanted the smoke!! LOL I also used my On the Edge Die for the bottom. I used the "Ornate" die. and yes you can purchase it at Outlaw Women Scrapbook Emporium fondly called OWSE.. I also used Black UTEE for the Butterflies.. Tim used embossing powder in his technique but I wanted to go a bit further with it. I had a lot of fun with the Challenge this week.
I had been waiting for it as my Mojo has suddenly come back to me after a weeks hiatus!
I couldn't create anything for about a week. I'd sit at my work desk and not a thing would inspire me. I have about three projects going on and didn't feel like working on any..

It's the damn weather! Hotter then hell here in Indiana!! Come on Winter.. I really hate hate hate the summers. And they are getting worse every year..

well now that I'm finished whining thanks everyone for taking a peek at my piece this week.


Monday, August 1, 2011

Distress Stains and me


SI hardly ever use my Distress Stains. This morning I decided to get them out and give a go. I put one color on my mat and swiped my glossy cardstock through it. Dried it real good and then a second color and second layer. Same does with drying. Time for a third Layer of color. When all was dry I spritzed with water..Then over the background I stamped Tim's Papillion stamp with Vintage Photo Distress INk..I used my Martha Stewart Punch for the bottom.. I stamped my ATC Collage using this special ATC Paper from LaBlanche Studio. Added that after distressing with some Black Soot. I then created the butterfly out of Acetate and painted it with Alcohol Inks.

Added some bling and a button and Voila one tag for a Challenge over at OWSE..

I'm also entering this into Simon Says Stamp.. I have never entered anything of mine there before. Their challenge is to make a tag. Fits huh? LOL


Hey!!! Thanks for looking